Showing posts with label How to. Show all posts

Saturday, March 01, 2014

Free Tutorial: How To "Share Your Tree With Family" For Ancestry.com Users

Teach Me Genealogy is here to teach you how "share your tree" on Ancestry.com.

Why do Ancestry users share their family tree?

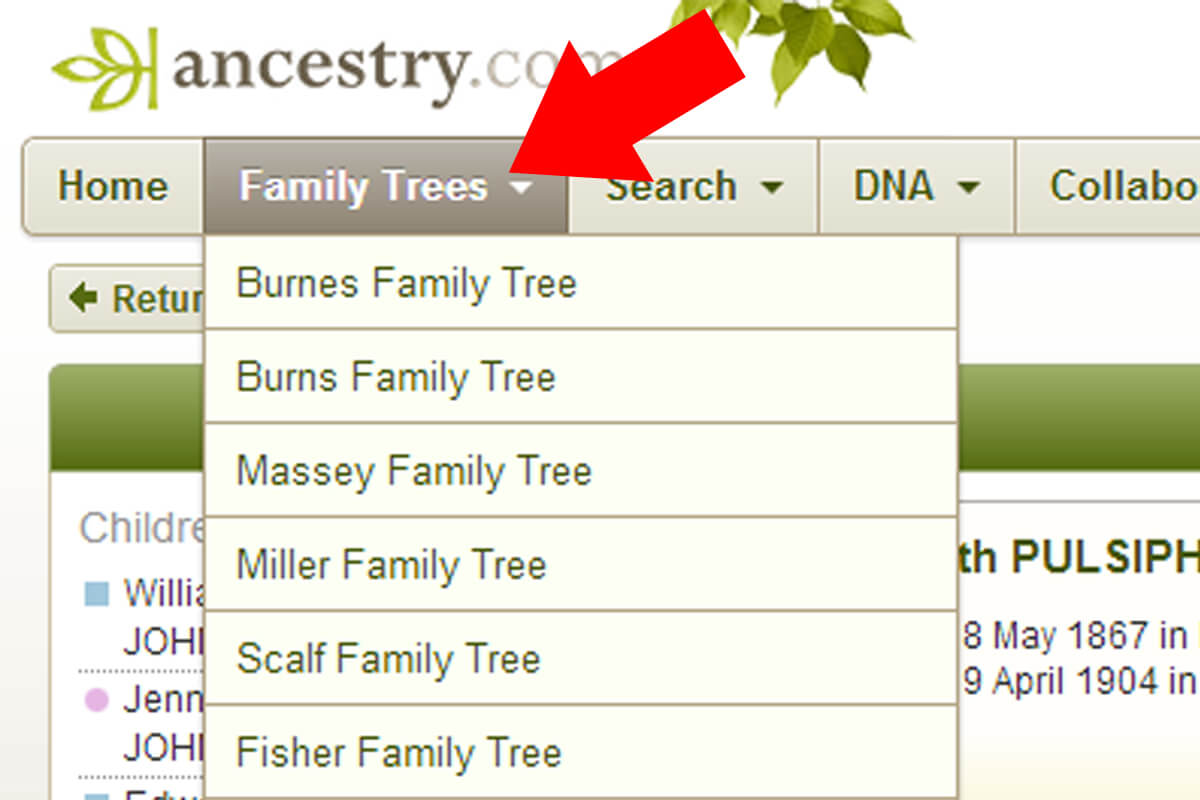
It's most commonly used for living relatives sharing information between each other.  It allows you to share your family tree instead of spending hours adding the same information to your own tree. They share and you share; everyone is happy. I personally have one family tree, but 10 total because cousins have shared their trees with me and I have shared mine with them. Once they have shared their tree with you, it does not merge with yours, it has it's own family tree name and is listed with your other trees. (See image 2 below).

Here's how...

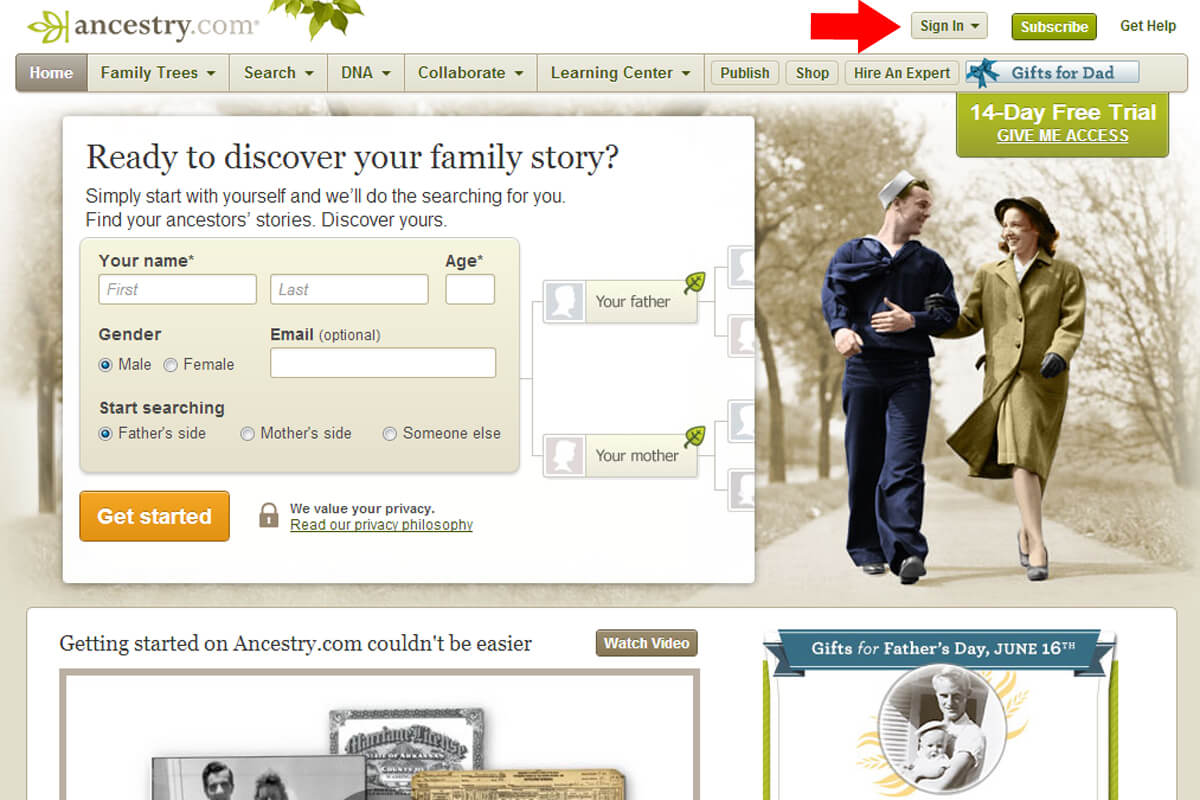
Step 1:  Sign in to Ancestry.com with your username and password.


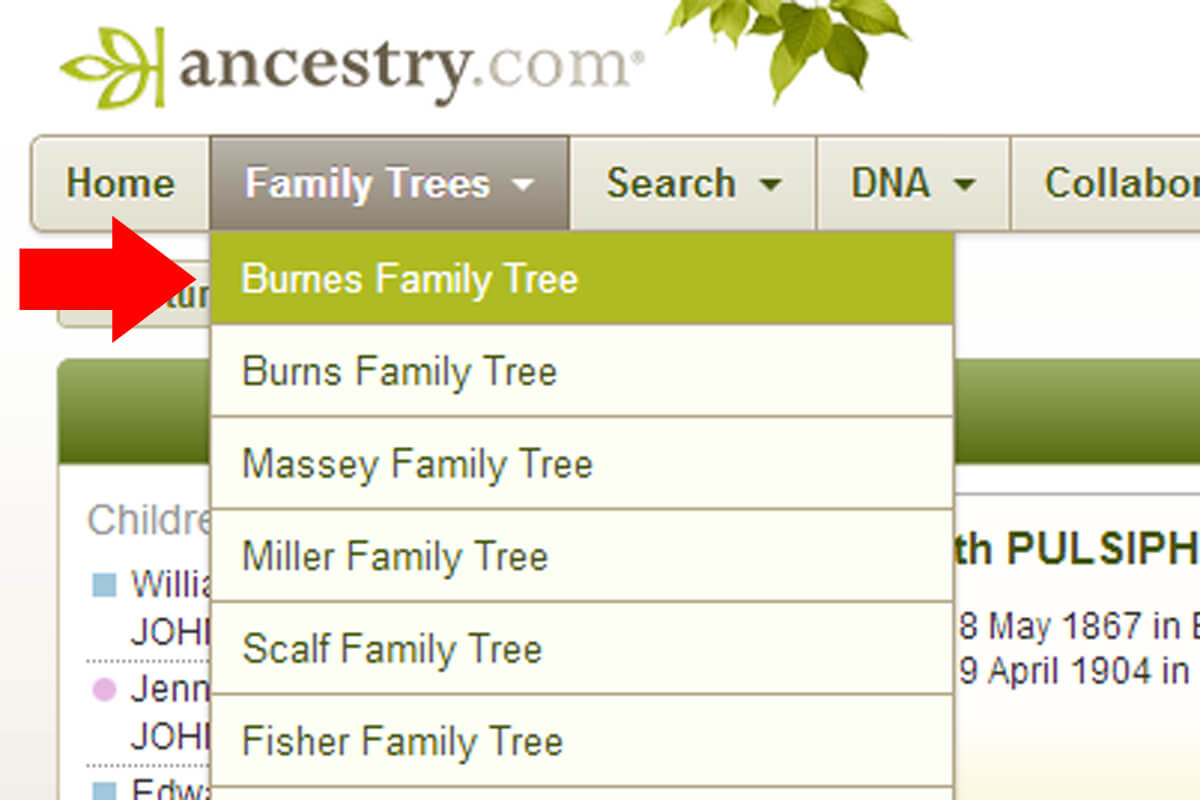
Step 2:
 place your cursor over the "Family Trees" tab at the top.


Step 3:  Click on "More...

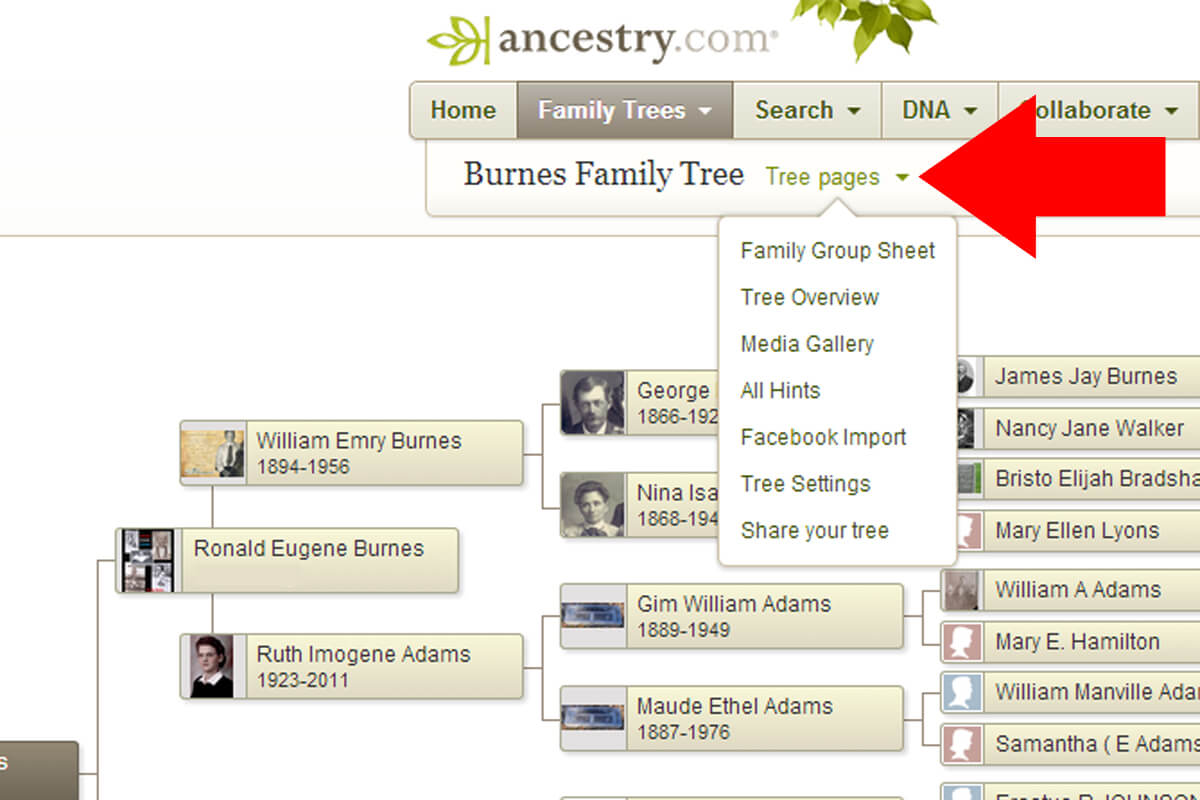
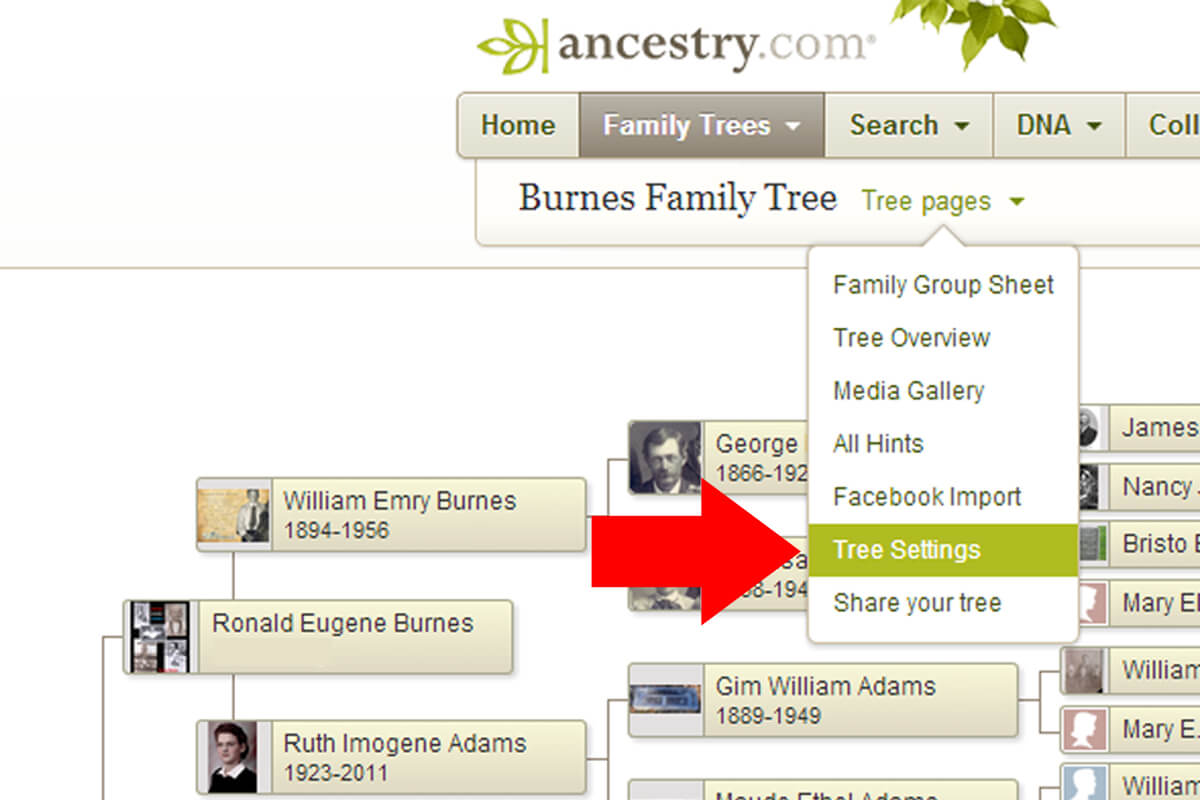
Step 4:  Click on "Manage tree"


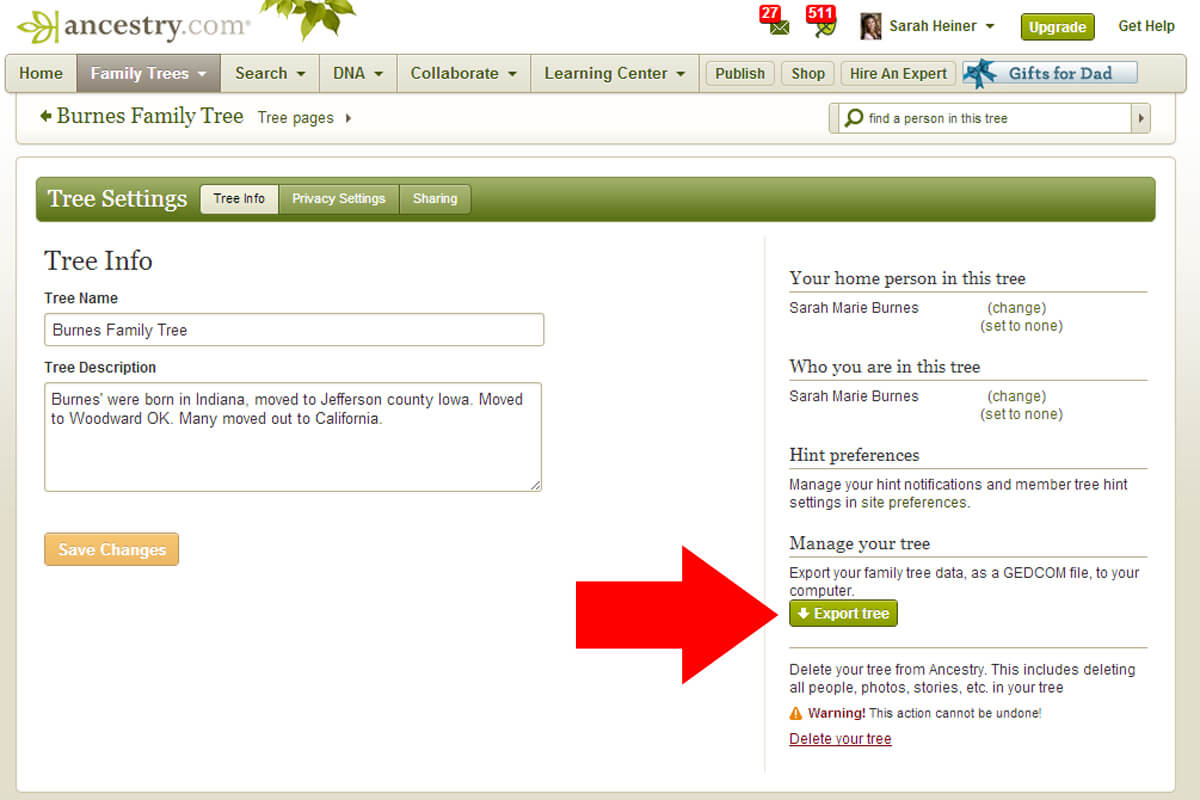
Step 5: Click on the "Sharing" tab.


Step 6: Click on "Invite people".


Step 7: Click on either "Email" or "Username".


Step 8: Type in the email of the person you want to send your family tree to.

Step 9: Choose their role. I usually choose "Guest or Contributor" (you can always change these options later.)


Step 10: Include a personal message. (If you choose).

Step 11: Click on "Send Invites"


YOU'RE DONE! EASY RIGHT?

Let me know if you have any questions. I hope you've enjoyed this tutorial. Many more freebies are coming your way.


Keep connecting the dots. -Sarah :)

Friday, June 07, 2013

How To Export Your Family Tree From Ancestry.com

Many people have asked me "how do I export my  family tree from Ancestry.com so I can import it to my genealogy software?" Well, this is surprisingly easy to do with these six steps of instructions and images to follow. Here's how...

Step 1:   Sign in to your ancestry.com account:


Step 2: Click on "Family Trees"


Step 3: Click on the family tree you want to export:


Step 4:
Click on "Tree pages"


Step 5:
Click on "Tree Settings"


Step 6: Click on "Export tree". Save your family tree file to your computer. Don't worry, your family tree will still be in ancestry.com, this will only make a COPY of your family tree when it's exported.


That's it!! Once your family tree has exported, it will be a GEDCOM file, which means you can import it to any genealogy software of your choice. Have fun!!

GEDCOM stands for GEnealogical Data COMmunication.


Wednesday, October 10, 2012

How to Use Google Maps To Track Your Ancestors Travels

I thought of an idea to track our ancestors travels using Google Maps. This could make a very unique gift, in very little time. Take a look at my map below.

Here's the Travel Map of my Burnes Ancestors, starting in Maryland in 1720, 
and ending in Napa, CA in 1943
  1. Go to www.google.com/maps
  2. On the left under the Google logo, click on "Get Directions"
  3. You will now see an "A" with a type box and a "B" with a type box. Click on the "A" Type Box and type the location of your oldest ancestor.
  4. Click on the "B" Type box and click the next location that your ancestors traveled to.
  5. Click on the "ADD DESTINATION" link under the "B" for as many times as needed.
  6. Now you will see "C","D" "E" etc. Continue to add the next destinations to where your ancestors traveled to. NOTE: If you ever need to change the destinations around (Maybe "C" needs to be in the "A" position), simply drag the letter to that position and your map automatically updates.
  7. Last, take a screen shot of this map by pushing the "PrtScn" button on your keyboard and save it to your hard drive.
That's it. Super easy right?? If you want to take it a step further, you can add, text of places and dates in either Photoshop or Microsoft Word and crop it like I have done on mine.

Remember to save this map by clicking the "MY PLACES" tab at the top next to get directions. then click on "CREATE MAP". Give it a title, then click the "DONE" tab.

Frame it for an amazing gift!!

Total Cost: $0
Total Time Spent: 5-10 minutes

Friday, September 28, 2012

Using Photoshop to Create Timeless Heirlooms: Framed Photo with Keywords and Grandpa's Signature. 7 Easy Steps.


I will teach you how to use Photoshop to create Timeless Heirlooms IN 7 EASY STEPS:

You WILL NEED:

  1. A scanned or copied photo of a family member or ancestor (never use original photos)
  2. Some Keyword facts about your family member or ancestor (see image for examples)
  3. Photoshop, (you can download a free trial here).
Here's a framed  photo of my Grandpa, William Emry Burnes, using keywords to portray the man he was.  After doing research and asking grandma questions, I learned so much about him. So with the gathered information, I decided NOT to write a novel, instead I would write "keywords" to portray his character and attributes.  My goal was to keep the interest of my reader and in 10 seconds or less, they would know who my grandpa was. For the finishing touch, I wanted to add something personal; his signature, which I happened to find on his fishing license. So I scanned it, and using Photoshop, I pieced it all together. This has probably been my favorite Family History Project yet!!

I promise this is EASY, and if you don't have Photoshop, you can download a free trial 
here.

My Grandpa was a Mechanic and a Sheriff, so I thought these accessories worked perfectly..
I found the cute sheriff's car for $20 and the mechanic sign for $10 both at Hobby Lobby.


My Grandpa's signature was the the perfect touch to complete this heirloom. 
The frame was 50% off $28, so I paid $14 at Hobby Lobby.
YOU WANT THIS NOW DON'T YOU? Well I am here to teach you. 

STEP 1: Open Photoshop, and create a new file (Click on "File" then "New")
I named the file and set the parameters to this below: 

STEP 2: Open your favorite background image (or use this one below) and drag or copy the background into the current file. I will share this famous background with you, here you go: (Click on image to enlarge then right mouse click and "save image as").

IMPORTANT:  STAY AT LEAST 1/8 OF AN INCH AWAY FROM ALL EDGES FOR FRAMING. (ctrl + R, gives you the ruler for guidelines . If you don't plan on framing, take your image to the edge of your design.

STEP 3:
 Open the image you would like to use of your family member or ancestor (do not drag or copy it into your file yet).  Click on the "POLYGON LASSO" Tool (looks like this):


STEP 4:
Start using the polygon lasso tool by LEFT MOUSE 
clicking in small areas around the image until you have come completely around to where to started from and do one last left mouse click. You'll now see little dancing lines, click on the "DRAG" tool, and drag it into your file.
Drag tool will look like this:


Here's the result:


STEP 5:  Fix the jagged edges and color.  As you can see, there were a few rough edges (especially around the head), so with a fine eraser brush of 5 pixels (with soft edges), erase those jagged edges. ( click on the icon that looks like an eraser on the Left side). 

Fix the color: As you can see it's very yellow, so I added a "COOLING FILTER" to this this by clicking on "IMAGE" (at the very top) then "ADJUSTMENTS" then "PHOTO FILTER" then "COOLING FILTER 80" and set it to 25% (any more than that, will make the image too blue). Then I brightened and added more contrast until it looked like this.
NOTE: If your original image is too blue add a warming filter instead.

Here's the result from fixing the color and jagged edges: 

STEP 6:
  Add the text. Click on the "Text" Tool (on the left) It looks like a capitol "T" and add the KEYWORDS that explain your family member. I used words like: Sheriff - 5'7" - Christian - Napa, CA - Navy WWI, and so on. Do as many or little words that you would like. Remember save some room on the bottom for the signature. If you don't have a signature to add, make your words equally spaced from the top.


After you've added the words, It should look like this:


STEP 7:
  Add the signature. I opened a scanned copy of my grandpa's signature and using the "POLYGON LASSO TOOL" from before, I cut around his signature and dragged it into the file.

After you've added the signature, It should look like this:
Send your digital creation off to be printed. I used Costco because it was only 39 cents (.42 with tax) for a 5x7 print and it only took 1 hour.

Now for the final touch; the frame. Get a 5x7 frame (mine is from Hobby Lobby $14) and frame your AMAZING HEIRLOOM.

WA-LA, YOUR DONE!!  Notice how the 1/8th inch border was the perfect amount for framing.


Total Cost: $14.42 (Includes frame and 5x7 print)
Total Time: 25-45 minutes

Don't have the time to do this?
The Teach Me Genealogy Design Team can create this for YOU for only $20
(high resolution jpg image w/ print release)

send an email to sarah@tmgenealogy.com with your image and keywords.
"Connect The Dots"

Friday, September 14, 2012

How To Use Facebook To Find Living Relatives

Facebook isn't just for Social Networking! In fact, this powerful platform with more than 900 million users has helped me to connect with many people, including distant cousins. Yes, Facebook is awesome for more than one reason!!

As I began on my family history adventure, I was learning more about my heritage than I could ever imagine. After only one year of extensive research, I traced my lineage back 7 generations, which was quite the conquest, considering that I didn't know my paternal grandfather (father's, father), or anything about him. After discovering that my Great, Great, Great Grandparents, George Washington Burnes & Sarah Walker Burnes had settled in Hope, Indiana I was anxious to get out there. So, I booked a flight to Indianapolis, Indiana and left on May 18, 2007. After a successful trip of meeting family and transcribing headstones, my knowledge of my heritage had increased, and I felt closer to my ancestors.


Many of my siblings have joined Facebook, but a few have not embraced the Facebook phenomenon. So I did a search for my brother JAMES BURNES, and the first person to show up was someone who resembled my brother, with the same name and spelling, but lived over 2,000 miles away; in Indianapolis, Indiana. The city he lived in was a clue that we could be related, so I wrote him a message and guess what I found out?

Here's the screenshot from our first conversation on Facebook:


As you can see, from our conversation above, we discovered we are 4th cousins, which means we share the same Great, Great, Great Grandfather; George Washington Burnes. From our connection, we have acquired many photographs and details about our ancestors that we never knew existed. More importantly, we have "CONNECTED THE DOTS" and our family continues to grow.

Give it a try!!
Start searching for distant cousins on Facebook!!

Find more BURNES info at www.myburnesclan.com

Tuesday, June 26, 2012

How to Volunteer at Find A Grave

What is Find A Grave? www.findagrave.com is a free online database of cemeteries throughout the world. Over 80 million online memorials have been preserved on this site from volunteers.  These memorials may contain birth and death dates, pictures, biographies and more specific information. Just today, there were  11,625,957 visitors on this site. Take a look, your relatives could be here!

What volunteers do?
  • Add and manage online memorials of family, friends or anyone.
  • Photograph headstones at your local cemetery for people in other states.
  • Submit a photo request for someone else to photograph your ancestors headstones in another state. 
Why should I become a Find A Grave volunteer?  As a Find a Grave volunteer, you choose what you want to do, and how often. Becoming a volunteer does NOT mean you are obligated to do anything. It simply means, you can help out when you can. I became a volunteer at Find A Grave , for the opportunity to preserve my ancestors headstones, and manage their information myself. When I traveled to Indiana to do family research, I spent most of my days in Norristown, Cemetery where most of my ancestors are buried. I noticed that Norristown Cemetery had very few names entered on Find A Grave. So, before it was too late, I photographed and transcribed hundreds of headstones in that cemetery. Honestly, I kinda felt like Indiana Jones as I pieced together broken headstones like a jigsaw puzzle to reveal their identity. There were even headstones that had fallen over, and were buried by grass with the inscription unreadable, but with a little effort, they were saved. Knowing that I helped give an identity to those buried in this cemetery is beyond words. In just a few days work, the unknown became KNOWN and preserved!
Image above: Headstones of my great, great, great grandparents; George Washington Burnes & Sarah Walker Burnes (the 2 on the left), buried in Norristown Cemetery.

For me, and the thousands of Find A Grave volunteers, the rewards are greater than expected. It's a great act of service. It's about doing the right thing for those who lived a much harder life than we have. It's a small way to pay it back as we preserve and remember our forefathers.
Here's an example of what an online memorial looks like: Click image to enlarge

How do I become a volunteer?
  • Go to www.findagrave.com Below is  an image of what the landing page will look like: (It's not the most glamorous website, but the content of this website is amazing!)
  • On the right, under the " FIND GRAVES " section, the 6th bullet point down, click on the link that says " JOIN THE FIND A GRAVE COMMUNITY ". The new page will look like this:
  • Type in your information. Then, on the bottom, you will see a check box for becoming a photo volunteer. Check the box if you would like to become a photo volunteer for others, or keep it unchecked, if you no not want to do this. (I checked the box when I signed up, and I don't have to photograph unless I want to). Finally, Click on " SEND MY INFORMATION ".  
That's it!! You're now part of the Find A Grave Community! If you have any questions, please contact me at sarah@tmgenealogy.com.

Click here to view Sarah Burnes Heiner's Public Find A Grave Profile >>

Wednesday, February 08, 2012

How to use Technology for Genealogy - iPad, Smart Phone, Apple TV, Laptop...

If you have one or more of these devices below, here are just a few ways to maximize your Genealogy with Technology.
  • Use your smart phone for photo, video and audio. I have made many audio & video recordings of my grandma while asking her questions with my iPhone. The audio was better because my grandma didn't like being video recorded and she was much more relaxed with the audio. Anytime, you're visiting a Genealogical Library, Cemetery or family history site always record & capture your findings.
  • Use your iPad for genealogy research, photos, video, audio and watching home videos of your own family, parents, grandparents, and cousins.  The iPad because it's larger and the quality is better than the iPhone for video, audio and photo. Once you have taken your pictures you can upload them to your Blog, Photobucket or Flickr so they are online and safe. If you have taken videos you can easily upload them to your YouTube Channel as another form of backing up your data. 
  • Use your Apple TV to watch videos, audio and photos on your TV that you have just captured. You can also go to your YouTube Channel with the apple TV to watch all your home videos. It's a fun way to spend a family night together.
  • Use your Laptop or PC for genealogical software that builds your family tree, collecting data, researching, and storing all your Genealogical information here. Any family history photos, videos or audio that you capture, place in this folder. Create a Genealogy folder on your desktop to keep everything organized. You can even customize your genealogy folder to have an image of a "family tree", click on the family tree image below for instructions.

Genealogy with Technology for the 21st Century.
-Sarah

Tuesday, February 07, 2012

How to create a Family Tree Folder on your Desktop

Create a unique Genealogy folder on your desktop that is visually easy to locate.


For Windows Users:


Step 1:  Make sure all other applications are closed or minimized so that you see your desktop. Right mouse click on your desktop (not folders) until a box opens. In the box, click on "NEW", which will pop open another box with multiple selections, click on "FOLDER". (See Image Below). Click image to enlarge.


You should now see a standard Folder Icon on your desktop that looks like the image below.


Step 2:   Right mouse click on the "NEW FOLDER icon and click on rename and type in "GENEALOGY". It should look like this

Now it's time to give your new Genealogy folder a unique look that will stand out from the rest.

Step 3:   Right mouse click on your new Genealogy folder, a box will open, click on "PROPERTIES" located at the bottom.  See image below. Click on image to enlarge.


Step 4:    A new box is now open. Click on the tab on the top right that says "CUSTOMIZE", then the button that say "CHANGE ICON". You will now see a new window pop open where you can choose your new icon. See image below. Click on image to enlarge.


Step 5:   Use the arrow scroll bars to scroll to the right until you find the icon that looks like a family tree. Click on the family tree and click on "OK" at the bottom. See image below. Click on image to enlarge.


Final Result:   You now have a unique Family Tree Icon on your desktop for your GENEALOGY folder.

Thursday, January 26, 2012

How to Write a Bio - William Aaron Burnes 1967-2006

5 Tips for writing a Bio:

  1. Keep it short! Half page, 1 page max.
  2. Write in 3rd person.
  3. Stick to the Highlights.
  4. Show the person's personality.
  5. Don't be boring!
Here's an example of a Bio that I wrote for my brother:

William: 'wil' (will, desire) and 'helm' (helmet, protection).

William, a man with a STRONG WILL, fought a courageous battle against cancer, but lost the fight on March 13, 2006.  However, as many can attest, he lives on beyond the veil where the human eye cannot see.

William Aaron Burnes was born in Napa, California on May 29, 1967 to Ronald Eugene Burnes & Linda Ann Johnson Burnes.  He was the Grandson of William & Ruth Burnes, and Aaron & Gloria Johnson, and was given the name William Aaron in honor of his two grandfathers.

He lived life to the fullest and succeeded in all that he did.  “Work hard, play hard with a dose of humor” was his motto.  As a marine in the 3rd Recon Battalion for 5 years, he attended the Maritime Fire Academy.  He was passionate about the work he did as a Commercial Fisherman and Chief Engineer Contractor.  He was well known for his creative talent and ability to build anything to which he set his mind. Classic cars brought him a great deal of pleasure, starting with his beloved 1978 yellow Camaro.  His travels took him to countries like Korea, Norway, Germany, Greece, Paris, England, and Japan, and enjoyed scuba diving in some of these remote waters. He loved to read positive books by authors such as C.S. Lewis and Lance Armstrong. He admired influential people like; Ronald Regan, WWII Soldiers and tough wild west Cowboys.

The oldest of 11 children, Will provided an example to his siblings and extended family.  He had the desire to assist those less fortunate and was instrumental in helping many get a fresh start in life.  A strong passion for life, and his faith in God inspired by his Christian beliefs, empowered him to love deeper, give more, and fly higher than most could ever dream.
Before his passing, he felt a great connection with his ancestors and began learning more about them.  It was not long before they began calling him home. The pain was gone and he was welcomed into heaven by loved ones excited to see him again.

“Think of him still as the same, I say, He is not dead, he is just away”.  - James Whitcomb
Riley


William Aaron Burnes: May 29, 1967 – March 13, 2006

Written By: "lil sis" - Sarah Burnes Heiner


William Burnes Pictures >>

William Aaron Burnes Online Memorial >>

Remember:

  1. Keep it short! Half page, 1 page max.
  2. Write in 3rd person.
  3. Stick to the Highlights.
  4. Show their personality.
  5. Don't be boring!
Bio = Short, Biography = long.